Friday, January 25, 2008

an adaptation


With an intense craving for sweets one night and being quite lacking in ingredients, I made these pear almond cheesecake tartlettes, adapting the cheesecake recipe from alpineberry. They turned out really pretty and tasty. The filling is almost custard-like, contrasting nicely with the crust. You can bake them longer to get a firmer cheesecake. Unfortunately I didn't have almonds on hand, but I'm sure using them in the crust and also sprinkled on top would enhance the flavor and appearance of the tartlettes.

Pear Almond Cheesecake Tartlettes

Crust:

1/3 cup all purpose flour
1/4 cup granulated sugar
1/3 cup oats*
1/8 tsp baking soda
pinch salt
2 1/2 tbsp melted butter
1 tbsp honey

Filling:
8 oz cream cheese (softened)
1/3 cup granulated sugar
1 medium egg, beaten
1/2 tsp vanilla extract
1/4 tsp almond extract
3 tbsp butter, melted

Topping:
2 pears, sliced thin
**

For crust:
Combine flour, sugar, oats, baking soda, and salt. Stir in honey and melted butter until mixture is crumbly. Place about 1 1/2 tbsp of mixture into each mini tart pan, and press down. Bake in a 350 degrees preheated oven for 8-10 minutes until golden. Remove and let cool.

For filling:
While the crust is cooling, beat cream cheese with sugar until mixture is smooth and the sugar has dissolved. Mix in egg until combined. Stir in vanilla and almond extract, and melted butter. Mixture should be smooth and free of lumps.

To assemble:
Pour filling into cooled crust, about 3/4 full. Arrange pear slices on top. Bake in a 350 degree preheated oven for 30 minutes until top is golden and cheesecake is set.

Let cheesecake cool before topping with sifted powdered sugar.

*substitute with 1/3 cup coarsely ground almonds
**top finished cheesecake with toasted sliced almonds


<3 trader joe's


I really appreciate small markets like Andronico's and Berkeley Bowl. They not only carry unique foodstuffs that you can't find at those impersonal chain supermarkets (i.e. Safeway) but usually the quality is better and the produce fresher. I mean, come on, why buy a jar of Jiffy's peanut butter that's been package god-knows-how-long-ago when you can get a container of honey roasted peanut butter that you freshly ground yourself. I'll be the first to admit, living in the Bay area has completely spoiled me. A Trader Joe's recently opened not too far from my apartment (relatively speaking), greatly adding to my joy and eating pleasure. I love their white stilton with dried apricots, tiramisu gelato, and huge hunks of Ghiradelli chocolate. I got a piece of white chocolate and made these white chocolate walnut cranberry cookies. I thought the combination of white chocolate and cranberries would be strange, so I made a batch without cranberries. I definitely like the cookies with. The tartness of the cranberries adds a freshness and cuts through the sweetness of the dough. You can soak the cranberries in either juice or alcohol until they're plump. I also tossed in 1/2 cup of chopped walnuts because I personally like nuts in my cookies. I had them already toasted, but untoasted would also be fine.

White Chocolate Walnut Cranberry Cookies

makes about 2 dozen small cookies

1/2 cup unsalted butter (softened)
1/2 cup packed brown sugar
1/3 cup white sugar
1 egg (beaten)
1 tsp vanilla extract
1 1/2 cup all purpose flour
1/2 tsp baking soda
pinch salt
3/4 cup dried cranberries
1 tablespoon cranberry or orange juice, or 1 tablespoon rum or calvados
3/4 cup white chocolate chunks
1/2 cup chopped toasted walnuts

Soak dried cranberries in juice or liquor.
Cream butter and sugar until well blended. Beat in egg and vanilla extract until smooth. Combine flour, baking soda, and salt in a separate bowl, and add into butter mixture. Mix until combined. Fold in cranberries, chocolate chunks, and walnuts. Drop by heaping spoonfuls onto greased cookie sheet and bake in a 375 degrees preheated oven for 8-10 minutes. Remove from oven while cookies are still soft in the center and let cool on sheet.

Enjoy~

Monday, January 21, 2008

agar agar


I used gelatin to make panna cotta a few weeks ago but found that at almost $3 a box, it’s too expensive to experiment with. I came across a box of agar powder at an Asian market last weekend at far less the price and found that it could be substituted for gelatin.


Coconut Coffee Flan

Coconut cream layer:
1 ½ cup coconut milk
½ cup milk
2 tsp agar
¼ cup granulated sugar

Heat above ingredient in saucepan, melting the sugar and agar. Bring to complete boil. Pour into mold and let cool. Mixture should set at room temperature. Refrigerate if desired.

Coffee layer
2 cup prepared coffee (flavored or unflavored)
¼ cup granulated sugar
2 tsp agar

Heat above ingredients in saucepan, melting sugar and agar. Bring to complete boil. Cool slightly and pour over set coconut layer. Be careful that the coffee mixture does not gel in the pot as it is cooling. However, if that does occur, simply re-boil it to dissolve.

While I enjoy the creaminess and distinct flavor of coconut milk, I found that using all coconut milk in the recipe is too cloying. You can adjust the amount of sugar in both layers to suit your taste.

Agar is derived from seaweed, and is the vegan substitute for gelatin, which is made from calf hooves. Most often used in the science laboratory to make agarose gel plates for the growth of bacterial colonies, agar also makes an excellent (and cheap) thickener and stabilizer in cooking. It is essentially tasteless and can be used interchangeably with gelatin to make mousses, panna cotta, etc. The usual ratio of liquid to agar is 1 cup: 1 teaspoon. This can be adjusted to you preference for the set mixture. Less agar will result in a softer consistency while more agar will give a harder "toothier" jelly. Agar will not be as effective with certain ingredients, such as citrus or chocolate.

Thursday, January 17, 2008

dark chocolate


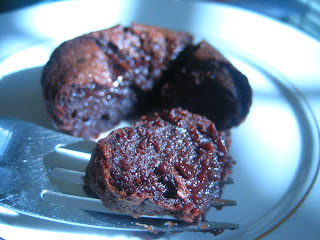
Dark chocolate molten cake, my final treat to my family before i left for Berkeley. So good....
Good thing about this cake is that the batter is actually better if made in advance. The egg in the mixture will have a chance to relax and deflate, producing a dense, chocolatey cake. Put the batter in the fridge up to a day before, and bring to room temperature before baking. Enjoy.

Dark Chocolate Molten Cake
Make 4 large muffin sized cake or 6 regular muffin sized cake


1/2 cup unsalted butter

4 ounces dark chocolate
3 large eggs
1/4 cup granulated sugar
3/4 tablespoon brewed coffee
2 teaspoon flour

Melt chocolate and butter in a double boiler over medium heat, let cool. Beat eggs and sugar together in a separate bowl until smooth and pale. Add to chocolate mixture and mix until smooth. Stir in coffee. Sift in flour and mix to combine.

Line muffin tins with liner and divide batter evenly between each well. Bake at a 450 degrees preheated oven for 6-8 minutes (for the regular size tins), depending on how you want the center. 6 minutes will give a fairly liquid center and 8 minutes gives a very moist, pudding-like center, both of which are wonderfully rich and decadent.


Sunday, January 13, 2008

food for though...

Benefits of soy beans:
  • complete protein containing many essential amino acids
  • high content of polyunsaturated and monounsaturated fat (good for the heart), fiber, vitamins, minerals
  • low content of saturated fat
Soy vs. cow's milk
  • Equal amount of proteins
  • Soy milk's main dissacharide is sucrose, which breaks down into fructose and glucose. Because of the lack of lactose, soy milk can be drank by those who are lactose intolerant or suffering from galactosemia (inability to digest galactose, a byproduct of lactose breakdown)
  • Soy milk contains less saturated fat than cow's milk and no cholesterol
  • Soy milk contains lecithin (protects large intestine from colon bacteria) and Vitamin E (antioxidants)
  • Soy milk contains little digestible calcium (however, most manufacturers enrich their products with digestible calcium carbonate)

-------------------

A traditional Chinese breakfast is hot sweetened soy milk (豆浆 dou jiang) with crisp fried dough strips (油条 you tiao). Indeed, whenever we go back to China, my aunt would buy several containers of fresh soymilk for breakfast every morning. The street vendors set up their stands early in the morning, drawing crowds with the aroma of sizzling, golden you tiao, and the rising steam of soy milk. The flavor of the off-white liquid is rich and smooth, distinctively nutty.


In the states, we like to make our own soy milk. It's a simple process, with gratifying results.

Soymilk
makes about 5 cups

1 cup dry soy beans
granulated sugar to taste
water

Soak dry soy beans overnight (8-10 hours). Add about 1/3 cup soy beans to blender and add water until blender if 1/3 full. Blend until liquid. Pass puree through fine cheesecloth and squeeze to get all the liquid out. Be careful to not let pulp pass through. Strain again if desire. Place strained soy milk into pot and bring to boil. Add sugar to taste. Serve hot or cold.

You can adjust the water in the blender to obtain your preferred thickness of soy milk. And since I like my soy milk rather sweet, I also add in quite a bit of sugar. Allow the hot soy milk to cool before pouring into a pitcher and refrigerating.

Friday, January 11, 2008

the overripe and the blue...


It seems that we always have a bunch of bananas getting brown and overripe. So they become excuses to make either banana pancakes, banana muffins, or banana bread. Instead of adding in the usual chopped walnuts or chocolate chips, I threw in some blueberries. Toss the berries with some flour to prevent them from sinking to the bottom of the bread during baking. I like this recipe for moist banana bread - they keep well and are wonderful with a cup of hot tea. The blueberries add a burst of sweetness against the mellow banana flavor.

Blueberry Banana Bread
make 1 9x5 loaf

2 cups all purpose flour
1/2 tsp baking soda
a pinch salt
1/2 cup unsalted butter, softened
1/2 cup packed brown sugar
1 egg
1 1/2 tsp ground cinnamon
5 tbsp milk
1 tsp vanilla extract
1 1/2 cup mashed ripe bananas (about 3 large bananas)
1/3 cup fresh blueberries
1 tbsp all purpose flour

Cream together butter and sugar until smooth. Add in beaten egg and mashed bananas, and mix well. Stir in vanilla extract. In a separate bowl, combine flour, baking soda, salt, and cinnamon. Add to banana mixture and mix until just combined. Add in milk, being careful not to overmix. Toss blueberries in 1 tablespoon flour to coat; add to batter and gently fold in. Pour batter into greased loaf pan and bake in a 350 degree preheated oven for 60-65 minutes, until the top is golden brown and cracked, and a toothpick inserted into the center comes out clean.

Thursday, January 10, 2008

little eukaryotes...


I started working with yeast a few months ago, baking my first loaf of bread - honey oat. I then proceeded to make a second loaf of honey oat the next day, then a batch of French bread, then cinnamon rolls, raised cakes, Chinese-style buns, etc. I was pretty much hooked on working with yeast. I love kneading the dough, working it from a sticky mess to elastic smoothness; I love the smell of rising bread.

Finding myself deprived of bread when I came home, I set out to make myself something. I turned to my trusted recipe with a few modifications.

Honey Walnut Bread
make 1 9x5 loaf

1 1/4 cup warm water
2 tbsp oil
1 tsp salt
3 1/4 cup all purpose flour
4 tbsp honey
1 1/2 tsp active dry yeast
1/3 cup walnuts, chopped

Dissolve honey in warm water, add oil, and sprinkle over yeast. Mix until yeast has dissolved and let sit for a few minutes until foamy. In a separate bowl, combine flour and salt. Add yeast mixture to dry ingredients and knead for 10-15 minutes, until dough is elastic and smooth. Cover and let rise in a warm area until double in size. Punch dough down and add in walnut. Place dough into bread pan and let rise again. Bake in 350 degrees preheated oven for 35 minutes. Brush top with a mixture of honey and milk during the last 10 minutes of baking to obtain a golden and sweet crust.

--------------
I used the bread for eggs-in-a-basket the next morning.
I like the yolk runny :)

of apples...


I've been trying new recipes for the past few days, subsequently supplying my family with dessert the evening of and breakfast for the following morning. There was a bag of gala apples in the fridge today and I have had my eyes on this recipe for a while.

I didn't have a 9" pan so I used an 8" one and kept an eye on the cake while it was in the oven. The batter is fairly thin for a cake, and bakes up creamy rather than cakey. It's almost like a custard though I suspect if I had let it bake a while longer, it may have been more cake-like. The apples were thinly sliced and arranged in a circular pattern (just for aesthetics). I would use sweet and crisp apples, like fuji or gala, because they hold up well during baking. Don't skip the glaze, it lends a sweet crispy topping, contrasting nicely with the slightly tart apples. Thank you Helen for a wonderful treat.

Apple Cake (from Tartelette)
make 1 8" cake

Cake:

1/2 cup all purpose flour
1/8 cup corn starch
1/2 cup granulated sugar

1/2 cup + 1 tbsp milk
1/8 cup oil
2 medium eggs
2 tsp baking powder
pinch salt
3 apples, peeled, cored, thinly sliced

Glaze:
1/4 cup butter, melted
1/4 cup granulated sugar
1 tsp vanilla extract
1 medium egg

For cake: Combine flour, corn starch, sugar, baking powder, and salt. Set aside. Combine eggs, milk, and oil until well blended. Beat in dry ingredients until just blended. Batter will be thin. Pour into greased 8" round pan. Arranged apple slices on top. Bake in preheated 350 degree oven for about 15 minutes until apples are beginning to brown.

For glaze: Beat egg and sugar until light. Add in vanilla and butter. Pour over apples after cake has been baking for 15 minutes. Bake cake for another 20-25 minutes until cake is cooked through.


small piece of heaven...


I came across a recipe for Mini Mocha Rocha Cheesecake by Alpineberry. I thought I'd try it on my family while I'm home. I made a few modifications based on the ingredients I had on hand and they turned out very tasty. My mom has been complaining that no one's eating our large container of Brown & Haley's Almond Roca, so I grounded up a few for the filling of the cheesecake. I also substituted the cashew in the crust for toasted walnuts, which lend a wonderful fragrance and texture to the crust, complementing well with creamy cheesecake and melty filling.

My cheesecake cracked on the top and some of the almond roca filling oozed out. I don't think I used enough cream cheese batter on the top. However, since the cheesecakes sink in the middle after they come out of the oven, I topped them with more ground almond roca and they looked fine.

Mini Almond Roca Cheesecake (adapted from Alpineberry)
make 9 mini cheesecakes

Crust:

1/3 cup all purpose flour
1/4 cup powdered sugar
1/3 cup walnuts, toasted

1/8 tsp baking soda
pinch salt
2 tbsp butter, softened
Filling:
8 oz cream cheese, softened
1/3 cup granulated sugar
1 medium egg
1/2 tsp vanilla extract
3 tbsp butter, melted
1/2 cup almond roca, grounded (enough for filling and topping after baking)

For crust: Preheat oven to 350 degrees and line 9 wells of a standard cupcake pan with liner. Process toasted walnuts, flour, powdered sugar, baking soda, and salt in food processor until walnut is finely ground. Add in butter and pulse until mixture resemble crumbles. Divide crust mixture evenly between the 9 wells and press down. Bake for 8 minutes until slightly brown.

For filling: Beat soften cream cheese with sugar until smooth. Blend in beaten egg and vanilla. Add in butter and mix until smooth.

To assemble: Add about 1 tablespoon cream cheese mixture to cooled crust, spread so that the crust is covered. Add in about 1 1/2 teaspoon ground almond roca. Top with another tablespoon or so of cream cheese mixture, making sure that the almond roca is completely covered. Bake at 350 degrees for about 20-25 minutes until golden brown. They will sink a bit as they cool.

To serve: Peel off the liner; there will be slight sticking along the edges. You can top the cheesecakes with more ground almond roca for additional crunch and decoration. Or add a dollop of whipped cream.


Wednesday, January 9, 2008

simplicity at its best...


There's nothing more appealing than a batch of chocolate chip cookies fresh out of the oven, the smell perfuming the kitchen, the delectable morsels beckoning. Break one in half to see the melting chocolate dotting the soft interior - none of those crisp cookies here, just simple, chewy, and delicious. I've searched for the perfect chocolate chip cookie recipe for a long time and finally came across this one. Before this, my cookies have come out cakey and puffy, but this recipe gives the bakery-style chewy cookies that I love.

A few notes about these cookies:
  • The butter must be melted
  • The cookies will not look done after you pull them out of the oven. Let them rest on the cookie sheet until they set. If you bake them any longer, they will harden as they cool
  • I always use chocolate chunks; I find that chips don't melt and you end up with hard pieces of chocolate in your cookies. If you like that, then by all means use chips, but I like my chocolate melted and gooey. I usually use the semi-sweet chunks from Berkeley Bowl (they come from the dispenser) or else chop up a chocolate bar
  • Feel free to add in nuts, toffee bits, chocolate-covered espresso beans, etc.
Chocolate Chunk Cookies (adapted from Allrecipes)
make about 20 cookies

2 cups all-purpose flour
1/2 tsp baking soda
a pinch salt
3/4 cup (1.5 stick) unsalted butter (melted)
1 cup packed brown sugar
1/2 cup granulated sugar
1 tbsp vanilla extract
1 egg
1 egg yolk
1 1/2 cup chocolate chunks (dark, semisweet, or milk)

Beat melted and cooled butter with brown and granulated sugar until well blended. Beat in vanilla, whole egg and egg yolk until light and creamy.

In a separate bowl, combine flour, baking soda, and salt. Add into wet ingredients and stir until just mixed. Be sure to not overworked the dough. Stir in chocolate chunks and additional add-ins by hand. Refrigerate dough for 10 minutes.

Drop by 1/6* cup fulls onto greased baking sheet, leaving plenty of space in between. I usually fit about 6 onto a standard 15x12 baking sheet. Bake in a 325 degree preheated oven for 11-13 minutes. Pull them out when slightly golden and let them cool on baking sheet.

*You can also make giant cookies using 1/4 cup dough per cookie. Bake for 15-17 minutes.