Sunday, September 6, 2009

sunday morning - the leftover tart


An attempt to clean out the fridge...

  • Line tart pan with dough from chocolate and banana cream tarts, don't trim the edges
  • Diced onions, peppers, and brown mushrooms sauteed in butter and olive oil
  • A spoonful of flour, cooked with the softened veggies until the raw taste is cooked out
  • Milk added to make a cream sauce
  • Season with salt and pepper
  • Stir in the cooked orzo from last night, a small spoonful of pesto, a handful of arugula
  • Spoon into unbaked tart shell and fold the excess dough over the filling
  • Crumble goat cheese over the top
  • Bake in a preheated 350 degrees oven for about 20 minutes
  • Enjoy on a beautiful Sunday morning

Thursday, September 3, 2009

birthdays and tarts! part II


For M's birthday - a fat duck and this little chocolate tart. The crust is from the banana cream tarts and the chocolate ganache from the same recipe is spiked with a few teaspoons of Bailey Irish Cream. I also broke up pieces of hazelnut brittle to add to the bottom of the tart. The assembly was easy. Tart shell, brittle, chocolate ganache. Topped it off with a few small shards of caramel sugar.

Hazelnut Brittle (adapted from Bobby Flay)

1/2 cup white sugar
2 tbsp water
2 tbsp light corn syrup
1 tbsp butter
pinch salt
1/2 cup toasted hazelnuts, chopped or halved


Heat sugar, water, corn syrup and salt in a heavy saucepan over medium heat until it becomes a medium amber in color. Stir in butter and hazelnut. Spread onto a greased pan and allow the mixture to cool. Break into smaller pieces.

Tuesday, September 1, 2009

birthdays and tarts! part I


I met Panda the first day I went to TKD practice. Within the first month, I concluded that we could never live together. She disliked cheese, nuts, and garlic in her fried rice. And me? My ideal lunch is a triple creme cheese with fig preserve on toasted baguette, my brownies and cookies come choked with walnuts, and I add garlic to everything. Whereas she lost 10 pounds during college, I...well never mind.

We have shared many good meals together, indulging in our love for good curry, nutella crepes, and tempura ice cream (yea I know 2/3 were desserts). She's obsessed with apple turnovers and always order banana cream pie when we goto Nation's. This little tart was for her.

Banana Cream Tartlettes
(adapted from the fabulous Tartlette)

Crust:

1/2 tsp salt
1/3 cup cold water
1 1/2 cup + 1 tbsp flour
1/2 cup + 2 1/2 tbsp butter, diced and chilled
1 1/2 tbsp sugar

Sift together flour, sugar, and salt. Cut in cold butter until mixture is coarse and crumbly. Add in water slowly, until mixture comes together. You may not need all the water. Form into a round disk, cover with plastic wrap and chill for at least 2 hours to overnight.

Roll out chilled dough to 1/8 inch thickness and cut to the size of the tart pans. Gently lay dough into the pans, trying not to stretch it. Dock the bottom with a fork, press a piece of foil over the crust and add in pie weights (I was out of beans this time so I used clean rocks ^^). Bake in a 375 degrees preheated oven for about 15 minutes. Then remove the weights and foil and bake for another 5-8 minutes until the crust is lightly golden. Let it cool to room temperature before filling.

Chocolate Ganache

4 oz semisweet chocolate, chopped fine
1/2 cup cream
pinch salt
2 tbsp butter, at room temperature

Place chocolate in a heat proof bowl. Heat cream and salt together, until just under a boil. Pour into the chocolate and let it sit for 30 seconds. Stir the chocolate and cream together, until smooth and shiny. Add in butter piece by piece, stirring just enough to blend the ingredients. The less you stir it, the shinier the ganache will be. Cover with plastic wrap, pushing the plastic right over the ganache. Set aside at room temperature.


Vanilla Pastry Cream

1 cup whole milk
1/8 tsp salt
2 tbsp corn starch
1/4 cup sugar
1 egg
2 tbsp butter, cut into small pieces
1/2 tbsp vanilla

Bring milk and salt to a boil in a small saucepan over medium heat. In the meantime, sift together sugar and corn starch. Add in the beaten egg and mix well. Slowly add in half the hot milk mixture, mixing to temper the eggs. Add the egg mixture back to the pan with the remaining milk, stirring constantly until you reach a thick consistency. Stir in vanilla. Remove from heat and pour into a bowl. Let it cool for 10 minutes and then whisk in butter, a small piece at a time. The mixture should be smooth. Cover with plastic wrap, laying the plastic right over the surface of the cream. Chill until ready to use.


To Assemble:

Spread a thin layer of ganache on the bottom of the tart shells. Slice a banana thin and on a bias. Layer in overlapping concentric circles over the ganache. Cover with pastry cream. Decorate with whipped cream, more bananas, and chocolate shavings.


strawberry tarts are delicious too

Wednesday, August 5, 2009


I've tried and failed at making lemon bars a few times before. Maybe because I was trying to find shortcuts or make 1/8 what the recipe calls for. The crust was always good, but the filling had none of the delicious gooey tartness that I love in lemon bars. During my last day at home, I finally made a batch (well, half batch) and while it's not perfect, it's pretty good.

I like my lemon bars tart, but if you like them sweeter, feel free to add more sugar to the filling or the crust. And please, use real lemon juice. The bottled stuff just doesn't cut it.


Lemon Bar

Base:
1/2 cup butter, melted
1 cup flour
1/3 cup confectioners' sugar
zest of 1 lemon

Filling:
2 eggs
2 tbsp flour
3/4 cup sugar
1/2 tsp baking powder
1/4 cup + 2 tbsp lemon juice
zest of 1 lemon

Preheat oven to 350 degrees.

Combine melted butter, flour, confectioners' sugar, and lemon zest to make the crust. Press into the bottom of a lined and greased 8x8 pan, making sure that it is even. Bake at a 350 degrees oven for 20 minutes. It should be barely golden.

To make filling, combine eggs, flour, sugar, baking powder, lemon juice, and lemon zest. Beat to get all the lumps out. Pour into baked crust and return to the oven for 25-30 minutes. The tops will be set and may be cracked. Let cool completely to facilitate cutting. Dust with powdered sugar.

Carrot Cake


I think I am in love with cream cheese frosting. The carrot cake is just a vehicle for my obsession.

Carrot Cake

1 lb carrots (about 6)
3/4 cup brown sugar
3/4 cup white sugar
3/4 cup oil
4 eggs
2 cups flour
1/4 tsp baking powder
3/4 tsp baking soda
1 1/2 tbsp cinnamon
pinch salt
1/2 cup raisins
1/2 cup walnuts, chopped

Preheat oven to 350 degrees.

Grate the carrots using the bigger sized grater. Mix in 1/4 cup brown sugar to the grated carrots. Toss in the raisins to allow them to rehydrate in the carrot juice that is released.

Whisk together the eggs, remaining sugar, and oil. Add in flour, baking powder, baking soda, cinnamon, and salt and stir until just combined. Stir in the carrot mixture and add in the chopped walnuts.

Pour into a 9x11 greased and lined pan and bake in a 350 degree oven for 30-40 minutes. Let cool before frosting.


Cream Cheese Frosting

8 oz cream cheese, softened (1 package)
2 oz butter, softened (1/2 stick)
1 tsp vanilla extract
1 1/2 cup confectioner's sugar, sifted

Whip cream cheese and butter until smooth and fluffy. Add in vanilla. Gradually whip in confectioners' sugar until silky. Add in more confectioners' sugar if you prefer it sweeter. Store covered in the fridge.

Thursday, July 9, 2009

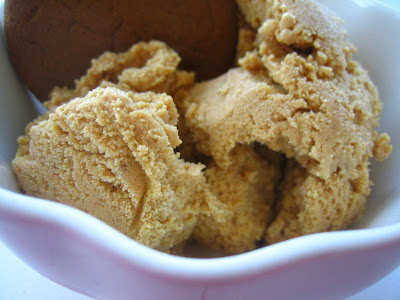
Burnt Sugar Gingersnap Gelato


There really can't be such a thing as too much ice cream, especially when a carton of cream and a dozen eggs are begging to get used up in 3 days. Tempted by the weather and finding a small dent in my wallet from the ridiculous amount of Ici I've been getting the past few weeks, I decided to rouse my ice cream maker out of hibernation.

Ici has a fabulous brown sugar gingersnap ice cream, which I somehow remember as burnt sugar gingersnap. The taste is still in my memories, but the name seem to have gotten scrambled. Go figure. I must be getting old. Anyways, I turned once again to Dorie Greenspan and adapted her recipe for burnt sugar ice cream into this little tasty treat. The slight bitterness of the caramel, the hint of salt, the spice of the gingersnaps - it's definitely not vanilla.

Burnt Sugar Gingersnap Gelato

3/4 cup sugar
1 tbsp water
1 cup cream
2 cups whole milk
4 egg yolks, room temperature
1 tsp vanilla
1/4 tsp salt
5-6 gingersnap, crushed

Add sugar in a single layer to a saucepan (use a 3 quart or something of that size), and pour water on top. There's no need to stir right now, just allow the sugar to melt over medium heat. The sugar will clump before liquifying. This is the point when you have to keep an eye on it. Stir the melted sugar infrequently until it achieves a dark caramel. It should just start to smoke and barely smell like it's about to burn. Remove the pan from the heat and add in the cream and milk. Be careful, it's going to bubble up viciously. The caramel will seize up with the cold liquid. It's going to look like a mess but don't worry. Just return the pan to the stove over medium heat and stir frequently to melt the caramel into the cream and milk. It will be smooth again in a few minutes.


In a large bowl, beat egg yolks slightly. Add a ladle full of the hot cream and milk mixture to the beaten yolks, whisking briskly to temper the yolks. Add another few ladles to bring the temperature of the yolks up to that of the liquid. Add the yolks back to the pan and cook the custard over medium heat until thickened. Make sure to not boil. Add in vanilla extract and salt.

Pour the custard into a bowl set over another bowl of ice water and stir to cool. Place a layer a plastic wrap over the top, laying it right against the custard to prevent a skin from forming on top. Let it chill completely in the fridge.


Once the custard is chilled. Pour into an ice cream maker and churn according to manufacture directions. Once done, stir in the crushed gingersnap cookies and pack into a container. Let it freeze to set up some more, or, if you can't resist, eat it soft-serve style.

Friday, June 19, 2009


I can't believe I've never made rice krispie treats before. I've only had the prepackaged ones with the shiny blue wrapper and the little people in pointed hats. When bakeries carry housemade ones, they normally don't call out to me. I would be much more drawn toward the vibrant fruit tarts and luscious cakes.

D. asked me to make something for the banquet, so I went with this universally agreeable treat. Using the classic Kellogg recipe as a starting point, I played with the flavors, adding salt, peanut butter, and white chocolate. It was an easy recipe, made on the stovetop in one pot. I was tempted to eat it warm, standing by the stove, pulling off sticky clusters, and watching the marshmallow strands stretch to iridiscent strings.


Rice Krispie Treats

3 tbsp butter, unsalted
10 ounce bag marshmallow (snipe the regular ones in half, or use mini)
6 cups rice krispies
1 tsp salt
1/3 cup crunchy peanut butter
melted white chocolate to drizzle on top

In a large saucepan, melt butter over low heat. Add in marshmallow and peanut butter. Stir constantly until completely melted. Add in salt. Remove from heat. Add in rice krispies and stir until well coated.

Scrap into a 13x9 pan that has been either sprayed with oil or lined with parchment paper. Press down and smooth the top. Let cool and drizzle with white chocolate.

Thursday, June 18, 2009

Apple Crisp


Apparently living off fried rice (no matter how many variations) is not conducive to food blog updating. But in between the quick bites there are some thought out dishes. So here's to my first update in 6 months. Oh massive fail.

The apple crisp was something made out of necessity. I had planned on making a French apple tart for a gathering, but ended up scratching the idea because I was too busy that day (nothing important, just had to attend my graduation ^^). But I had already peeled a bunch of apples and they were just sitting in the fridge looking sad. They weren't spectacular eating apples, so I thought I would transform them into something more delicious.

I usually use raw apples for crisps, but cooking them gives them more flavor, not to mention the butter-brown sugar mixture makes a great sauce. As for the cute ramekin - $1 at Michael's. Finally Valentine's Day has some use.

Apple Crisp

Filling:
6 medium apples (crisp, not mealy apples), peeled, cored, and cut in big chunks
2 tbsp butter
3 tbsp brown sugar
1 tsp cinnamon
1 tsp vanilla extract
handful raisins

Topping:
1 cup all-purpose flour
1 cup oats
1/2 cup brown sugar
1/2 tsp cinnamon
1/4 tsp baking powder
1/4 tsp baking soda
pinch salt
1/2 cup butter, melted

For Filling:Melt butter in a saucepan over medium heat. Add in apples, brown sugar, cinnamon, and raisins. Cook until apples are slightly softened, about 4-5 minutes. Add in vanilla. Spoon into an 8x8 dish or into individual ramekins.

For Topping: Combine flour, oats, brown sugar, cinnamon, baking powder, baking soda, salt, and melted butter together. Spread over top of the filling.

Bake at 350 degrees for about 45 minutes for the 8x8 and for 30 minutes for the ramekins.

Saturday, January 31, 2009

Because I Can...


Saturday lunch for the family - chicken pot pie - because I think I can make it better than Marie Callender's. I had leftover pie crust from making apple pie earlier that week, so I made mine with just a top crust. You can use puff pastry for the crust as well, and change the filling to suit your taste. Feel free to add in herbs (rosemary and thyme are very nice), different vegetables and meats (though if you use something other than chicken it wouldn't really be a chicken pot pie).

Chicken Pot Pie

1 pound chicken breast, skinless, boneless, cubed (I used chicken tenders)
1 large onion, diced
2 carrots, diced
2 stalks celery, diced
1 1/2 cup frozen mixed vegetables (peas, green beans, corn, carrots)
1 clove garlic
Salt and pepper
Garlic powder

1/3 cup butter
1/3 cup all-purpose flour
1 can chicken broth (low-sodium)
1 cup milk or water

1 recipe for single pie crust, rolled out to fit a 9" pie dish

Heat up oil in a large saute pan. Season cubed chicken with salt, pepper, and garlic powder. Brown chicken, then remove to a separate dish (the chicken wouldn't be cooked all the way through). In the same pan, add more oil if needed, and cook onion, garlic, carrot and celery until softened. Add in mixed vegetables, and season with salt and pepper.

In a saucepan, melt butter over medium heat. Sprinkle flour over melted butter and whisk until smooth. Cook for 3-4 minutes until it looks like pale gold paste. This will cook out the raw flour taste. Add in chicken broth and water or milk, and whisk to incorporate. Simmer over medium low heat until thickened. Add in the chicken and sauteed vegetables. Check for seasoning, adding more salt and pepper as desired.

Pour filling into a 9" pie dish and cover with rolled crust. Fold the excess dough under the lip of the dish to seal. Brush the top with beaten egg and cut 2 or 3 slits on top to allow steam to escape. Bake in a preheated 425 degrees oven for 30-35 minutes, or until the crust is golden brown and the filling bubbly.

Monday, January 12, 2009

Something Greek

Bouts of laziness and other distractions have led me to being MIA for a while, but now I'm back, and glad for it ^^

Before Christmas (a very long time ago I know, I told you I've been MIA), Justin threw a holiday party. It was a lovely affair, a gathering of friends as intimate as family, celebrating the festivities with laughter, games, and the occassional voodoo mistletoe. It was raining that day, I remember, and when I woke up in the morning, I looked forward to being in the cheery warmth of the kitchen. I made a large batch of chocolate chip cookies, decorated with red and green M&M's, and some white chocolate cranberry cookies for Sandy. They're one of my favorite flavors, but Sandy has never tried them. I hope she liked them.

I remember back in high school when I tried to make baklava, and bought puff pastry instead of phyllo dough. That was an interesting night...I've been wanting to work with phyllo for a while, but it's one of those things that seemed a little too fussy for everyday eats. So Justin's party gave me the occasion to make these cute little phyllo triangles, spanakopita.

Traditional Greek spanakopita consists of phyllo dough wrapped around a filling of spinach and feta cheese, baked until golden brown. The sheets of phyllo are brushed with butter, and when baked, puff up to create delicate crunchy layers, juxtaposing with the creamy filling. It's a long process only because each triangle has to be wrapped individually, but each step is very simple in itself. The phyllo dough needs to be handled carefully to prevent it from drying out and cracking. Here are some tips on how to work with phyllo.

Spanakopita

1 package phyllo dough, thawed overnight in the refrigerator

1 onion, diced
2 (10 ounces) package frozen spinach, thawed, drained dry, and chopped
3 cloves garlic
1 bunch green onions, chopped
1/3 cup parsley, chopped
1/2 cup ricotta cheese
8 ounces feta cheese (plain or flavored)
1 large egg, beaten
salt and pepper to taste
Olive oil

To make the filling:
Heat olive oil in a large saute pan. Add in onion and garlic and cook until softened. Add in the drained spinach and green onions. Salt and pepper according to taste (be careful with the salt, since the feta is salty). Turn the heat off and stir in egg, ricotta cheese, feta cheese, and parsley. Allow filling to cool before proceeding.

Assembly:
Unwrap the phyllo dough from packaging and place flat. Cover with a damp towel (this prevents the dough from drying out and cracking). The thawed phyllo dough should be soft and pliable. There are several ways to fold the phyllo triangles, depending on preferred thickness of the phyllo layer and the overall size of the triangles. Since I was making appetizer-sized ones, I used the following process:
Remove one sheet of phyllo from underneath the damp towel (taking care to cover the rest), and place on work surface, short size facing you. Cut the sheet in half width-wise (cut is parallel to the short side of the sheet). These 2 half-sheets will each make 1 phyllo triangle. Taking 1 half-sheet, brush the lower half with butter and fold the top half over, creating 2 layers. Place a spoonful of filling at one end, about a 1/2 inch from the edge, then fold the dough up like a flag. It's hard to explain in words, so here's a diagram. When you reach the end, brush with a bit of butter to seal the edges. Repeat with the remaining phyllo dough.

Fold


Fold some more, brush edge with butter


Done!

Place seam-side down on a baking tray and brush the top with butter. Bake in a preheated 350 degrees oven for 25-30 minutes, until golden. Serve warm or at room temperature. Don't stack them until they've cooled completely or they will turn soggy. I promise it's worth the work and it looks so much more complicated than it really is ^^

Warning: NOT for weight-cutters